
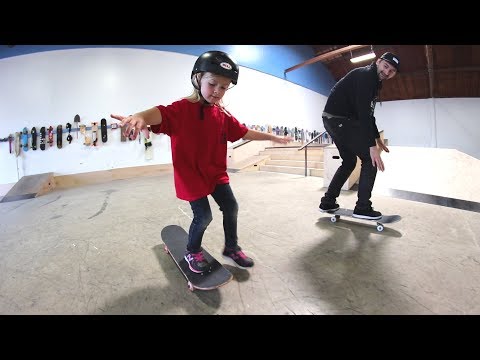
You recently bought a brand-spanking new kids skateboard for Ryan. What a great parent you are! Now it’s time to dive deep and tap into your teaching ability. It’s time to teach your child to ride a skateboard so they can start enjoying the wheely thrill skateboarding offers. But how do you teach a kid to skateboard?
Related: Best Beginner Skateboards for Kids
In this teach a kid to ride a skateboard tutorial, you’ll learn all the practical tips you need to know to help your kiddo master their complete skateboard soonest possible.
You’re embarking on a journey that requires a little patience, but one that’s always greatly rewarding. Your child will always know you sacrificed money and time to introduce them to this wonderful pastime. And who knows, they might like this outdoor activity enough to want to become a professional skateboarder someday.
Don’t want to read the entire post at this time? I suggest that you watch the video below and learn how you too can transfer your skateboarding skills to your little one.
Before we proceed any further, there’s a crucial question parents keep asking. They ask, can a 7 year old ride a skateboard? And others ask, can a 4 year old ride a skateboard? What these parents are actually asking is: at what age should a child start skateboarding?
The right age for a child to learn skateboarding is 5 years. According to the American Academy of Pediatrics, children younger than 5 years shouldn’t be rolling around on a wheeled board. Their balance and coordination skills and muscle strength haven’t developed enough to withstand the rigors of skateboarding.
I keep seeing young kids, sometimes younger than 4, riding a skateboard. And I fear for them, but since there’s nothing I can do about it, I ride on and forget about it all. I honestly believe letting a child who’s not reached their 5th birthday to skateboard is flat out reckless and irresponsible. If you think my opinion is too critical and harsh, ignore it. Instead, listen to what the AAP have to say about it and follow their advice.
Why You Should Teach Your Kid How to Skateboard
Why endure teaching your son or daughter to ride a skateboard when you could be doing easier, more enjoyable stuff? Entrepreneurs and anyone who cares about achieving success to some degree knows the importance of understanding the why of things.
As in why do I want my kiddo to learn to skateboard? For me, teaching our boys to skateboard was motivated by just one positive thought: parent/child bonding. My husband and I wanted to cultivate better, stronger relationships with our sons.
We knew there’s no better way to achieve this without facing a certain level of resistance. We were wise enough (well, that’s not always the case haha) to realize that a shared experience would be a great way to get everyone to connect and perhaps even open up about never-before-revealed stuff.
I wonder if our elder son would ever have opened up about being bullied at school by some troublesome little dude named Richard. We were just cruising around one fine Saturday afternoon, and he started sobbing.
I’d never seen our son display emotion this way (not counting his toddler days here), but he did. Of course we all stopped and listened to what he had to say, and after some pep-talk and a visit to the school, the issues were fully resolved and now our son is happier and more lively than he’s ever been.
And I have a feeling he trusts us more now that he learned he can be vulnerable with us anytime and get all the attention and care he needs.
So, what’s your why? It could be that you’d like to know your child better, or explore their creative side with them, or just spend time with them because that’s a time-honored tradition for your family. Once you establish the WHY, committing to the teaching process won’t be a problem. At least, it was easier for us after we identified our WHY.
Summary: How to Teach Your Kid How to Ride a Skateboard
1.First things first: Buy them or build them a proper beginner skateboard. Also, make sure all the nuts on the wheels and trucks are tightened properly. Because no parent likes it when wheels fly off the board when their child is just learning to like skateboarding.
2. Find the right environment for learning: The very first lesson on skateboarding should happen in an environment that’s safe, one that inspires confidence. The carpet in the basement or living room is one such place. The next best place is the backyard. It doesn’t matter whether you have turf grass or natural grass there.
Essentially, you want to teach lesson number #1 on a surface a flat surface that’s not too smooth. You want a surface that won’t encourage the wheels to roll back and forth right from the start. A super smooth hard surface such as the garage would make it appear like skateboarding is a risky hobby that can lead to a sudden fall.
3. Place the board on the carpet or grass.
4. Ask the child to get on the board, placing each foot around the end of flat portion of the deck. Typically, that’s where the bolts that connect the deck to the wheels via the trucks are.
5. Ask your kiddo to repeat step 4 above until they can do like it’s the most natural thing in the world. The more they do it without rolling back and forth, they more they believe they can safely stand on a skateboard without crashing. And that’s a BIG milestone in the learning journey.
6. Ask them to bend the knees slightly and start leaning forward and apply some pressure on the board through their toes. Let them also lean backward and press down on the deck by their heels. You want them to repeat this step as many times as are needed to attain mastery. If they can nail down this vital step, they can master steering*/turning a skateboard. And being able to turn on a skateboard is a critical skill.
7. Help the kid discover if they’re goofy-footed or regular-footed. The best way to learn this is to have the kid hop on the board and assume the usual stance, that is, knees slightly bent. Then, hold their little hands and sort of ride them around a few times. Start riding in one direction and then the opposite direction.
Next, ask them which direction felt easier or more comfortable for them. They should be able to know which foot they’d like to have at the front. This is their dominant foot. If it’s the right foot, then they’re goofy riders and if it’s the left foot, they’re regular riders.
8. Instruct the kid to plant their dominant foot on the bolts at the front of the deck while the other foot is still on the carpet or grass.
9. Ask the kiddo to start walking in the direction of their dominant foot. That’s what pushing a skateboard off the ground is. Once the board starts moving and they’re comfortable on it, have them swing the foot on the ground onto the back of the deck. They’re on their way!
10. Discuss with them the need for consistent practice and encourage them to get out often to ride. If they’re not yet 10, it’s best to ride with them. Or at least be there as they skate around with other little fun-loving tykes.
Here’s a more detailed how-to-skateboard tutorial…
But wait…
Can My Child Learn to Ride a Skateboard in a Day?
Most 5-year-old kids can learn the basics of skateboarding in a matter of hours. On day one of the teaching process, you can expect them to learn to jump on and off the board and roll around at low speed. As for learning how to stop on their board and carve properly, that can take a while. It took our sons a week or so to get the fundamentals of these aspects down. From there, how quickly their skating skills evolve is a function of practice frequency and personal determination.
Insist that Your Kiddo Gears Up Right Off The Bat
I see young children riding a skateboard without a helmet and wonder what their parents smoke. Those bones are weak and fragile, and I bet neither you nor your kid likes Emergency Rooms!
Helmets don’t guarantee protection against concussion according to the U.S. CPSC, but they help protect against severe brain injuries. So make sure the child helmets up every time they’re about to step on that board.
When it comes to the right helmet for skateboarding, they deserve no less than a dual-certified helmet. They need a kid’s skateboard helmet made per the CPSC Bike Safety and ASTM F1492 Skate Safety standards. A brain bucket that boasts these two safety certifications protects the top, front, and back of the head adequately without restricting head movement or obstructing vision.
Not sure which is the best kid’s skateboard helmet for the money? Here’s a resource you may want to check out: Best skateboard helmets for children. All of the options recommended in that resource look nice and fit most young heads perfectly.
It’s a really good idea if they pad up. If they must wear only one kind of protective pad, let it be wristguards. Wrist fractures are one of the most common injuries in young children. I also suggest that you have your kiddo wear knee pads. They’re going to fall many, many times. And some of the time, they’ll be sliding against rough or even rocky surfaces. Knee pads and wristguards do an amazing job at protecting the rider’s knee caps and wrists.
Is Your Son/Daughter a Goofy or Regular-footed Skateboarder?
There are two ways to know whether that young skateboarder is a goofy or regular rider. Here’s the first method: talk to them. Ask them which foot they’d put forward if they’re were running on ice and slipped? Most kids are able to answer that question accurately.
Here’s the second approach: have your kid step on the board with their knees bent a bit. Then, hold their hand and ride with them in one direction for about 30 seconds. Repeat this motion but this time around rolling in the opposite direction. Again, the child should be able to tell you which direction feels more comfortable.
If they’re a goofy footer, they’ll say they feel more comfortable riding with the right foot in the front and pushing with the left one. Only 1 in 4 (25%) of skateboarders ride goofy. This means that 3 in every 4 skateboarders ride regular. Regular footers feel more comfortable with the left foot at the base of the nose. They push with the right foot.
Teach the Kid How to Step and Balance on a Skateboard
Allow the kid enough time to feel the board.
First things first: help the child get stable and comfortable on their board. You’re learning on a patch of grass or carpeting. To do this, ask them to step on the board with one foot and then put the other on the board (behind the one the board). Ask them to bend a little. You want them to feel how a skateboard responds to different actions.
Next, ask them to try and point their feet to the side. It’ll sure feel awkward at first, and you can hold their hand as they try to get used to this strange feeling.
Then, ask them to try to push down on the board using their toes and to use their heels to lift the other side up. You want to provide support at this point. It can feel somewhat scary doing this, but the assurance that you have the covered breeds confidence.
Teach Them to Make the First Push on a Skateboard
At this point, ask the kid to place their preferred riding foot on the front of the deck. The toe of their skateboard shoe is facing forward in the direction they’ll push the board.
The other foot (the one they’ll use to push the board) is at this point on the ground. Now, ask the child to start doing their first push. How? It’s easy: ask them to start walking in the direction their preferred foot is facing. As they start walking, congratulate them for learning how to push on a skateboard!
As soon as the board starts rolling, ask the kiddo to lift the other foot off the ground and put it on the deck behind the other foot. If they’re not careful when executing this move, there’s a good chance they’ll fall forward. If they place the pushing foot in front of the riding one, that’s a recipe for disaster.
Also, the knees need to stay bent to some extent all the time. All forms of skating be it skateboarding, roller skating, or inline skating require the rider to bend their knees a little and generally stay low. Remember: your kid needs to get used to bending their knees and staying low all the time.
In this position, they keep their center of gravity low enough f0r stability. It’s harder to fall if the knees remain bent. Plus, pushing does get noticeably easier in this position.
How This Step Feels: A Little Scary
If you ask your son or daughter how it feels to lift the other foot and put it behind the other on the deck, they’re likely to say “weird” or “a little scary.” But as they practice this step again and again, the weirdness will vanish, and it’ll start feeling natural, comfortable, and safe.
Be sure to support your son or daughter by holding one of their hands (not two hands) whenever they need it. But you shouldn’t make them too dependent on your support, or they’ll never get courageous enough to roll around on their own.
Transition to a Harder, Smoother Surface
Now that they can step on the board, balance, and tilt the board up and down using toes and heels, it’s time to introduce them to a real skating surface. The garage would be an ideal place. The driveway is another good place, and if the sidewalk doesn’t see much traffic, you can sure go there.
On a hard smooth surface, the child needs to be a little more careful. The board tends to roll away very easily, so provide some support initially. Continue supporting them until they’re able to replicate what they learned on the carpeting or grass.
Teach Your Kid to Turn on a Skateboard
Watch the video below to learn how to teach your kid to turn on their skateboard
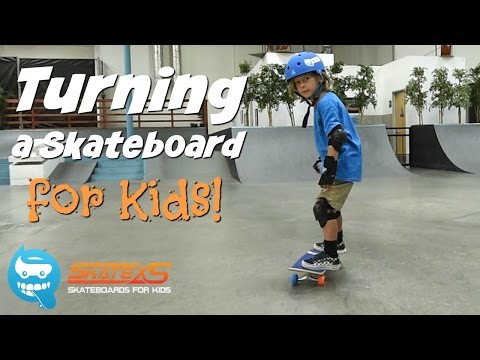
At this point of the learning process, your kid can wheel around on their board without a problem on level, smooth surfaces. It’s now time to teach them another fundamental skill: turning their board.
So, have them assume the usual stance on the board with their favorite foot stepping on the front. They’re not stepping too far forward or too far back. If they’re stepping too far back or too far forward, they’ll find themselves moving uncontrollably in a direction they didn’t intend. That is, they meant to skate straight on but end up turning to the right or left.
Ask them to lean forward a little with the knees bent slightly. They’ll naturally shift some of the weight forward and the board will tilt downward. Next, ask them to shift their weight backward by pressing on the deck with their heels.
To make the session even more enjoyable, they can start doing S-shaped turns. I’m talking about alternating backside turns with front-side turns. This is essentially what carving on a skateboard entails.
The next step is to start make these little weight shifts while in motion. The whole idea here is to turn the board in the direction the young rider wants. Being able to do backside and a front-side turns is a great skill. This skill will help them easily avoid obstacles such as cracks, rocks, and twigs. This is a life-saving skill; it helps them stay out of the way of walls, trees, people, and motorized vehicles.
Teach Your Kiddo How to Kickturn on a Skateboard
Kickturns are a must-master skateboarding technique for anyone who intends to spend time skating at the park. There’s bowls and ramps there. And the best way to instantly change direction and start riding in the opposite direction while skating bowls and ramps is kickturning.
To teach a child to kickturn, ask them to step on their board with their riding foot out front. Then, tell them to move the pushing foot a little rearward and put it on the tail. Moving the backfoot to the tail also requires shifting some their body weight backward.
Before they start practicing to kickturn, it’s best to have the child lift the front up and then step on it to push it back down. Let them do this a few times until it becomes second nature.
With more weight on the back of the skateboard, the front of the deck naturally lifts off the ground. When it does, instruct the youngster to kind of rotate the board by moving their hips in the direction of the toes. And that’s it. Kickturns help your kiddo do quick turns safely, and this skill will enable them to enjoy their board more.
Teach Your Kiddo to Stop and Fall on a Skateboard
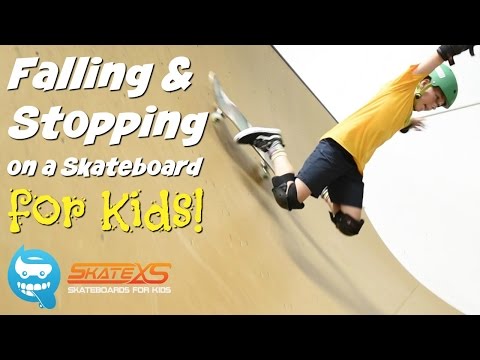
If you can’t stop when you need to, if you can’t fall “right”, skateboarding becomes a seriously dangerous activity for you. In fact, the ability to bail on a skateboard is one the most important skills you can teach your little angel.
Below are 5 ways to stop on a skateboard:
1.Jog off the board
2. Do a knee slide
3. Use the back foot as a braking mechanism
4. Use the tail of the skateboard as a brake
5. Powersliding
The best way to stop on a skateboard to use the powersliding technique. Powersliding isn’t something your child or any beginner can master at the start of the learning process. It’s an amazing skateboard stopping technique used by advanced skateboarders. Powersliding deserves an entire post, which is why I decided not to describe it in this tutorial.
Skateboard Stopping Technique #1: Jog off the Skateboard and Keep Going
To teach this stopping strategy, instruct your kiddo to step off their rolling board with the back foot first and then the front foot. Back foot first is the only safe way to do this, not front foot first.
Once they step on the ground or other skating surface, they need to keep running in the direction the board was going. This method works best when one’s not traveling too fast. This means it works best when skating on level or gently sloping terrain.
Skateboard Stopping Technique #2: Slide on Your Knees
This method is a great stopping strategy when skating steep inclines or transitions in a skatepark. Sometimes, one wants to stop fast or bail for some reason, and sliding on the knees gets the job done.
You probably don’t need to teach them this skill as they’ll most likely pick it up at the skatepark. It’s not a very hard trick, and watching others do it should be sufficient.
The beauty of this method is that there’s less need to put the hands out in an attempt to catch themselves. And that’ll save those little fragile wrists from nasty fractures.
Stopping Strategy #3: Use the Tail As a Brake
This is trickier than method 1 and 2 above, but it’s a great to stop. One needs to have some serious balancing skills to do it right each time.
Here’s how the process works: Your son is traveling relatively fast. To stop, they place the pushing foot on the tail of their board and transfer some of their weight there. The idea is to have the board progressively come into contact with the skating surface.
This method works, but it can put inexperienced riders out of balance quickly. Aside from that, it doesn’t treat the tail too kindly. If you use the tail as a brake all the time, it’ll lose the pop sooner than you imagine.
Stopping Technique #4: Use the Pushing Foot As a Brake
This is another not-very-beginner-friendly method. But it’s not as challenging as power-sliding. Here, your kid’s riding relatively fast. Then, they put their rear foot down onto the ground, heel first.
They shouldn’t put the foot down instantly and start dragging. Instead, they should drop the foot slowly, heel first and then the ball of the foot. Once the foot touches the ground, all they have to do is drag it.
It’s a great way to stop on a skateboard, but it’s also a surefire way to destroy the soles of your skate shoes. Even if your kiddo wears the most durable skateboard shoes, dragging them against the ground eats them up real quick.
Tips to Help You Teach Your Child to Skateboard
1.Be patient: The last you want when showing a young child how to ride a skateboard is to rush them through the process.
2.If your child isn’t yet 5 years old, please don’t introduce them to skateboarding. The bones and muscles of children that young aren’t strong enough to handle the tough demands and impacts of skateboarding.
3. If you must really let your child learn skateboarding before the age 5, make sure to be extra careful when teaching them. You want to keep a watchful eye on them the whole time because you never know what might happen.
4. If your child is 6 years or older, that’s a good age to teach them to ride a skateboard. But you shouldn’t simply buy a beginner skateboard and leave them to their devices. Instead, you want to provide parental supervision to them until they’re old enough to ride safely on their own. Once they reach the age 10 and have been practicing for some time, you can allow them to ride alone or with friends.
5. Be sure to check their skateboard just in case there are loose axle nuts/wheels or broken parts that might make the board unsafe in some way.
6. Make your child understand that they can’t step on that board until and unless they’ve worn all the gear they need to wear: a certified skateboard helmet, knee pads, elbow pads, and wristguards.
7. Make it clear what to expect: falls. Tell them they’re going some of the time, but that it won’t hurt much because they’re wearing protective gear. If they fall too many times without proper gear and you’d not made them aware it’d happen, they’ll likely give up and even start hating skateboarding before they learn if it’s the right pastime for them.
8. Every time they don’t do something right, explain why they failed and how they can have success next time they try it. This is super important.
For example, if the board gets shaky when they’re standing on it, it could be because they have their feet too close. So tell them to stand in a wider stance for better balance and stability.
Bonus how to teach a child skateboard tip: Make sure the skateboard’s trucks aren’t too tight or too loose. I recently wrote a resource that explains what each setup feels like and when to choose one or the other. Here’s the post: How to Tighten and Loosen Skateboard Trucks.
And if you have the time for it, here’s another post on Kids’ and Adults’ Skateboard Storage Ideas.
Conclusion
See, teaching a kid to ride a skateboard isn’t all that hard. But you agree it does take a bit of patience, consistence, and dedication. I believe you’re a loving parent or foster parent and don’t consider these requirements too demanding. And always encourage the child to keep practicing. There’s no better time to teach them the value of persistence.
Reminder: make sure to hand them their helmet and have them cover that fragile melon beyond hopping on that skateboard. Safe skateboarding!
I'm Esther Moni, a proud stay-at-home mom and a psychology graduate of the United States International University (USIU) . I hate it when anyone calls me a housewife, because what does housewife even mean? Being a mother of two babies and a pup, Bailey, as well as being Ricky's wife tires me to no end, but I still manage a smile at the end of it all. And when my boys aren't done doing mischief, I juggle writing a post on parenting or baby gear performance for this blog and running my little counselling office based out in Nairobi. <a href="https://www.facebook.com/esther.moni/">Visit my Facebook profile here</a>, and this is my <a href="https://ke.linkedin.com/in/esther-moni-3841b573/">LinkedIn profile</a>, and here's my <a href="https://www.youtube.com/channel/UCKcVb3NNDrURDH8C0KiAE1g/">nascent youtube channel.
