A booster seat places a child at an elevated position in a car so they can safely use the vehicle’s seatbelt. It boosts the young rider’s height so to speak, which is why they call it a booster. To get the most out of this car seat type, you need to install and use it correctly. And that’s what this post is about it.
Related: What Is a Booster Seat?
There Are Different Kinds of Booster Seats
There are different types of booster car seats. These include backless booster seats, high-back booster seats, and combination booster seats. The way you install a backless booster may not be how you install a high back booster, and installing a booster with the lower anchors is a different ball game altogether. In this How to Use a Booster Seat tutorial, you’ll learn how to install and use a backless booster, how to install a high backed booster, and how to install a booster seat using LATCH.
Related: What’s the 5-step Seatbelt test and how does it work?
How to Install a Backless Booster Seat According to the NHTSA
According to the National Highway Traffic Safety Administration, booster seats are installed differently to regular car seats. They don’t install as tightly as do normal car seats. The vehicle’s lap belts and shoulder belts as well as the passenger’s weight hold this child restrain system in place.
Regular car seats stay in place thanks to firm support they get from the lower anchors or seatbelt. Another difference is that installing a booster seat is way easier and less time-consuming compared to installing a standard car seat.
If you’d rather watch a video than read through walls of text, below is a useful backless booster seat installation video created by the NHTSA.
A backless booster positions the seatbelt of a vehicle across the passenger’s toughest parts of the body rather than on the most vulnerable ones. The same goes for a correctly installed adult seatbelt.
You want to use a backless booster in a car with a backseat that has a supportive headrest. Because a backless booster doesn’t come with any kind of head support, nor does it have a back (hence the name).

Step #1:Reading the Instructions manual is boring but super important.
Read through the booster seat’s installation instructions as well as the car owner’s manual before you embark on setting things up. Because every car seat model is different, and every vehicle is different as well. Which means the way you install one backless seat in a particular car may not be the way you setup the same child restrain system in a different car.
Step #2: Put the booster seat in the backseat of your car, mini van, SUV, or other vehicle.
Yes, the best place to install a backless booster is still in the backseat. It’s still a car seat, remember. And every credible authority on car seat use including the NHTSA says to always install car seats in the backseat.
BTW, the worst place to install any car seat is in the front of the car. Why? Because airbags can cause the death of the little passenger in the event of a crash.
During a crash, an active airbag might inflate, hitting the back of a rear-facing infant car seat and possibly injuring the child’s head. The same airbag could cause harm to a forward-facing child. That’s why it’s best to avoid the front passenger seat.
But wait, what if I own a pickup truck or other vehicle that has only one row of seats? If this is the situation you’re looking at, the experts at Mayo Clinic say you can install a car seat in such a vehicle AS LONG AS you can turn off the airbag.
The next thing to do is to put the child in the seat and fasten the lap belt and shoulder belt.
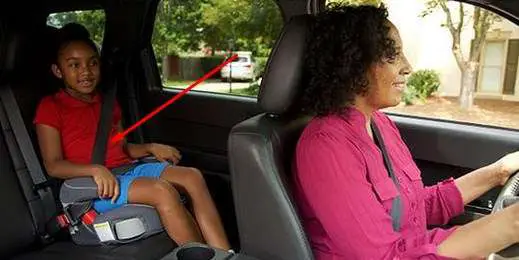
Step #4: Install the shoulder seatbelt correctly.
The correct way to install the shoulder belt is to position it right across the chest so that makes a diagonal line running from the middle of the shoulder. Take a look at the pic below to understand how the shoulder belt should fit when used with a booster seat.
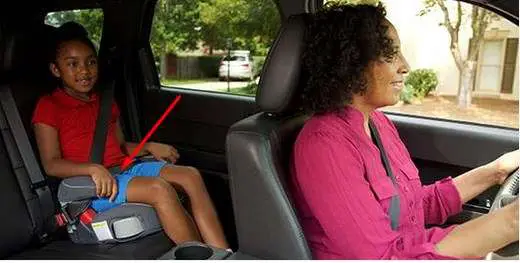
Step #4: Fasten the Lap Seatbelt across the child’s upper things.
One common car seat mistake parents and other caregivers keep making is applying the lap belt across a soft and easy-to-harm part, usually the belly. That’s a bad idea. Instead, pass this belt over the upper things and across the hardest part of this region, the hip bones. This area is tougher than the tummy as far as soaking up crash impacts.
Take a look at the photo below and notice how a properly installed lap belt lies when you correctly set up the seatbelt system.
Helpful tips:
Tip #1: If your backless booster came with seatbelt guides, put them to work so that you can achieve proper seatbelt positioning.
Tip #2: Where necessary, make adjustments to the backseat’s head restraint so that it positions better and provides better head support to the young passenger.
Tip #3: Buckle in the booster any time it’s not in use to prevent it from becoming a projectile in a crash.
How to Install a High-backed Booster Seat (According to Michigan Medicine)
Like a backless booster seat, a high-backed booster seat elevates children for correct seatbelt positioning. This kind of seat places both the lap belt and shoulder belt over the strongest parts of the body. You want to install a high-backed booster in a car whose backseat has a low back or doesn’t have a supportive head restraint.
Below is a video created by the experts at the University of Michigan to handhold you through installing a high-backed booster seat.

Follow the steps below to properly set up a high-backed booster car seat for your kiddo.
Step #1: Start at the beginning; read the instructions manual and car manual to learn exactly what to do.
This is obvious, right? But reading manuals isn’t any parent’s idea of fun. For the most part, reading through the instructions solves the problem right away, and you may not need to find any further information to complete the task successfully. So do it and get the job done.
Step #2: Place the high-backed booster seat in the backseat.
As mentioned above, the backseat (and preferably the center of the backseat) is the safest place to position any car seat. Placing it in the middle of the backseat is usually possible if it’s the only seat you’re installing.
Step #3: Position the child in the high-backed booster.
Make sure that the child sits upright and that they’re not slouching at all. The hips and back of the passenger need to be against the booster. And the knees should bend over at the lower edge of the seat to discourage hunching forward/slumping over. As for the feet, they should be resting flat on the floor of the vehicle.
The slouched seating position is a potentially dangerous one because it does two things:
(a) slouching often creates slack in the seatbelt and makes it loose, and this slack can make the seatbelt less protective during a crash.
(b) Slouching often causes the seatbelt to shift to a position that makes it less useful. The lap belt tends to ride up and finally sits across the belly instead of where it’s supposed to be.
Step #4: Fasten the seatbelt properly, guiding it so that it positions over the strongest parts of the body.
The lap belt should run across the upper thighs/around the hip bones and NOT across the stomach. The belly is softer than the hip bones, and it’s likely to get greater harm during a crash compared to the upper thighs.
The best high-backed boosters come with seatbelt guides. If yours has these guides, use them to position the seatbelts correctly.
Step #5: Buckle up the seatbelt.
Note: you should never use a lap-only seatbelt to secure a child in a booster seat of any kind. Instead, you should use a shoulder-lap belt. If you have an older vehicle with lap-only belts, maybe it’s time you upgraded to a newer model with the recommended safety belt system.
Step #6: Make adjustments to the headrest to properly position the shoulder belt.
Adjust the headrest to the correct height (consult the manual for the details) and then use the belt positioner to place it at the right locations.
Make the shoulder belt lie snug and flat on the collarbone and down across the chest (diagonally). Consider any other belt placement outside of this recommendation unsafe or at least less safe.
Next, adjust and fasten the lap belt so that it fits nice and snug across the upper thighs. The lap belt should pass beneath the armrests.
Once you’ve executed all these steps, you’re done, but your child should be mature enough to stay in this position for the entirety of the ride. If they shift too excessively, that’s a clear indication that they’re not ready for the booster seat and should continue using a forward-facing car seat with an internal harness.
Must-know safety tips when installing a high-backed booster seat:
- Don’t allow the child to put the shoulder belt behind them at any time during the ride.
- Never let your child to place the shoulder belt under the arm.
- When the seat isn’t in use, buckle it in so it doesn’t turn into a projectile during a crash.
- If the top of your child’s ears is higher than the top of the high-backed booster, that seat is too small for the child/the child is too big for that booster.
Why? It’s because incorrect shoulder belt placement can lead to injuries in the event of an accident according to the University of Michigan Health.
Now that we’ve learned how to install a booster seat without LATCH system, let’s go over how to install it with the lower anchors.
How to Install a Booster Seat With LATCH
Many combination car seats that offer the booster seat allow installing the booster seating mode with the lower anchors and top tether for forward-facing car seats. And recently, car seat manufacturers started making backless booster seats and high-back boosters with lower anchor connectors.
The lower anchors secure the booster seat to keep it from shifting the whole time you’re getting your child in and out of the restraint. And in the event of a crash, a properly secured booster seat doesn’t suddenly become a dangerous projectile.
But LATCH has weight limits, you say. So how does it securely hold a big kid that weighs 70 pounds? According to the Car Seats for the Littles, the lower anchors are meant to hold the booster seat itself and NOT the child seating in it. The seat belt will hold your child while the lower anchors hold the booster seat.
But how do you install a booster seat without using the seatbelt? Consult the combination seat manual to learn whether you’re allowed to install the booster mode with LATCH and top tether.
The steps below are general guidelines and you should refer to the user manual for specific booster installation details:
Step #1: Place the booster seat in the backseat.
Step #2: Get the lower anchor connectors out out wherever they store. In many case, these connectors store on the back of the booster seat; pull them out.
Step #3: Link these lower connectors to the lower anchors on the vehicle. Give the lower anchor connectors a tug to make sure they’re securely attached to the lower anchors. Never ever attach two lower anchor connects to the same lower anchors.
Final Thoughts On Installing Different Types of Booster Seats
A booster seat typically relies on the seatbelt and the precious cargo it’s restraining to hold it in place. These restraints are quite easy to install and remove and the process completes in a matter of minutes.
However, some boosters come with lower anchor connectors that attach to the vehicle’s lower anchors to stop shifting during use and also to keep them secure during a crash.
It’s incumbent upon you to keep the booster buckled in or secured via LATCH when not in use.
Safe rides!
As a medical professional practicing in the United States, Joe Waweru medically reviews every piece of relevant content at kiddofreddom.com, but nothing he says here should be construed as medical advice of any kind.
